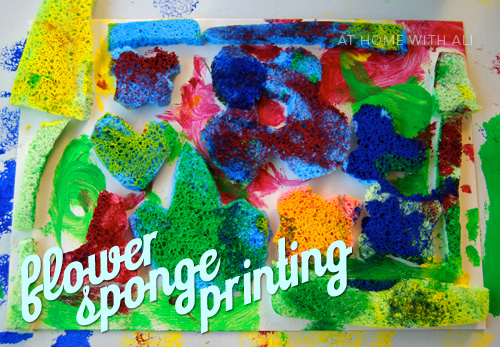
We love flowers in our house – we love to pick them, press them, draw them and paint them BUT we have never printed them. Then, I saw this brilliant idea from Teach Preschool – printing with sponges. I bought a few packs of cheap sponges and Cakey and I got cutting. She made a beautiful flower composition with her sponges. I was almost tempted to stop right there.... but we were both intrigued to see how the printing would work.
And, this is what we did:
- We cut out sponge flowers and shapes and glued them onto cardboard with pva glue. I would recommend a stronger glue if you want the sponge pieces to stick to the cardboard permanently..... this will make sense later.....
- When Cakey was happy with her sponge composition I made her wait for 10 minutes to let the glue dry before we started the printing process. I would have preferred more waiting time but kids don't like waiting!
- We mixed up a watery paint mixture in a tray. Our paint choices were really random - there was some watercolour paint and some acrylic too. We used a few colours in the tray.
- Cakey pressed her sponge composition into the paint tray and then transferred it onto the paper. At first she didn't press hard enough in the tray or on the paper but she soon got the hang of it.
- I helped Cakey to remove the sponge composition from the paper. We repeated this process until the watery paint mixture dissolved the pva glue and the sponge pieces fell off..... which is why you might want to use a stronger glue. On the other hand, my kids were happy to replace printing with soaking the loose sponge pieces in watery paint and squeezing them everywhere.
Check out this post from Red Ted Art for more printing ideas.
If this is your first visit to at home with Ali – welcome. If you like it, you can follow along through our facebook page or subscribe via email or RSS. Cheers Ali

Linked to It's Playtime and Kids Get Crafty


Oh fun, what a great idea! My daughter enjoys printing!
ReplyDeleteIt was great fun. Craft turned into messy play.... it took the whole afternoon.
DeleteLovely! We've done some sponge printing but not sticking them to the paper first to create a whole printed picture. I think my daughter would really enjoy it. Thanks for the idea :)
ReplyDeleteI hope it works, remember the watery paint will dissolve a water based glue after a short while.
DeleteOoh how wonderful that you did whole sheets to print with. A fabulous introduction to print making. Adore it!
ReplyDeleteThank you for sharing on Kids Get Crafty!
Maggy & Alissa
Thank you, I want to try your potato printing next.
Deletehttp://www.redtedart.com/2012/06/16/daily-creativity-simple-things-that-nurture-creativity/
Ali, I love these photos! That first photo is so colorful. I have pinned this to my painting board. Thanks for sharing :)
ReplyDeleteThanks for pinning.
Deletebeautiful! i like how the colors overlap!
ReplyDeleteThey did work out well, we gave the prints away to the grandmothers.
DeleteHi! Stopping by from the Kids Co-op. I loved your post and I am featuring it on Triple T Mum's Kids Co-op Showcase (published on Thursday). I am also pinning your post to the Kids Co-op Board.
ReplyDeleteThank you Amie, I am so glad you liked it.
DeleteThanks Ali for sharing on Kids Get Crafty. I always love your posts and am happy to stop by your blog :)
ReplyDeleteAlissa
Love how you made an entire "printing plate" with the sponges! Beautiful!!
ReplyDeleteSo pretty! What a fun project.
ReplyDelete